1,2,3 …. Cheese!
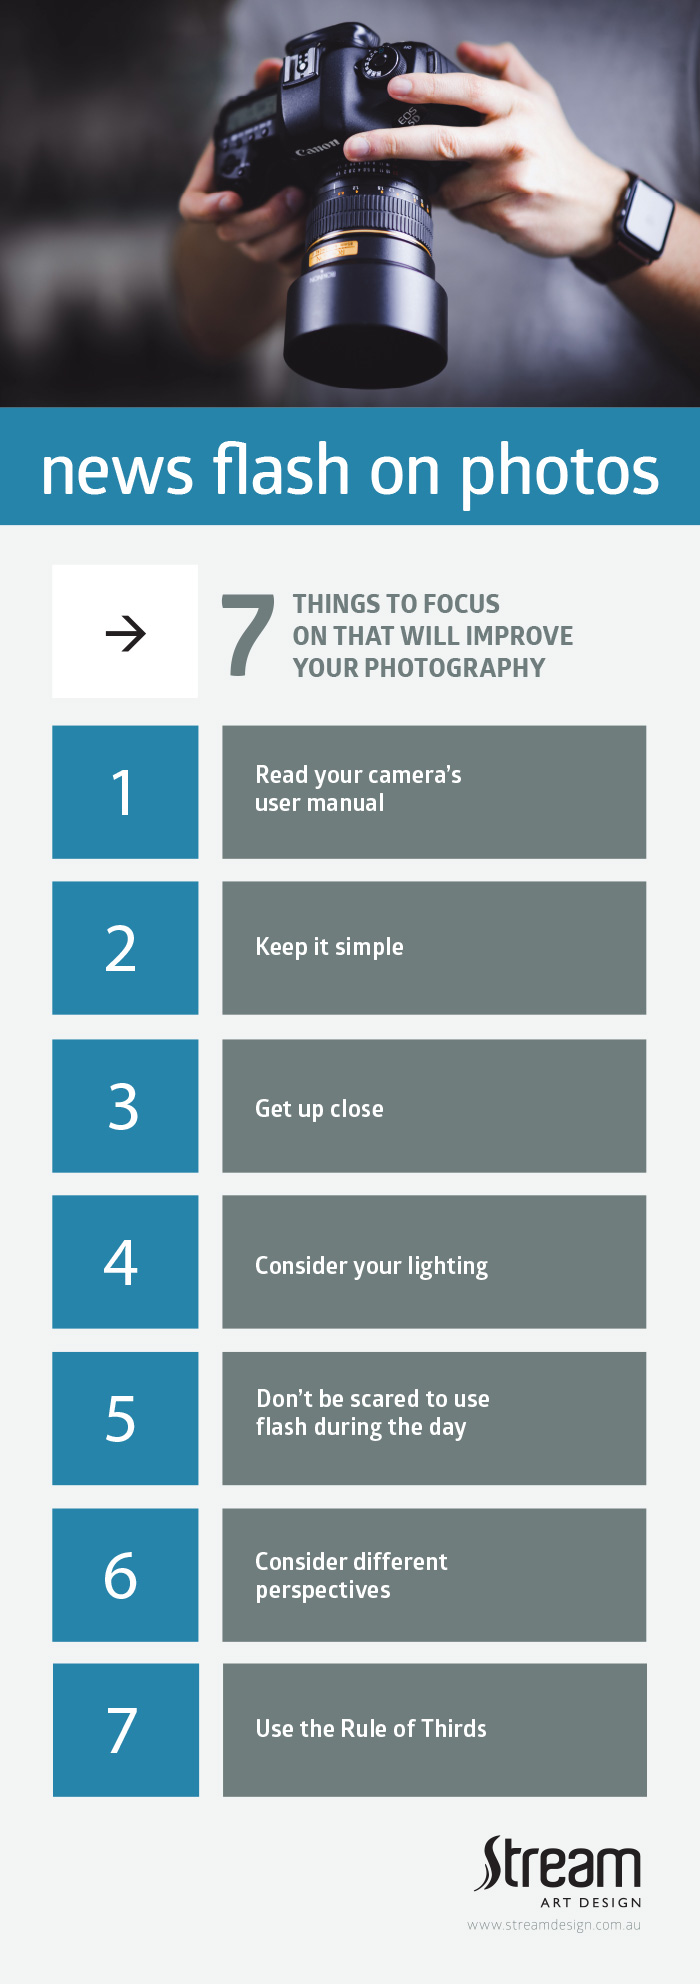
7 tips to focus on to improve your photography.
Ever travel on holiday with a group of friends, get back home and catch up to look at your photos, or go over them on Facebook and feel a little disappointed at your images compared to your mates? You were there at the same time, same lighting and same subject matter but somehow their pictures look a lot better than yours!
While there’s no denying studying the art of photography is the best way to master taking great photos, it’s true that with a few simple steps you can improve your photography and take photos you’ll be proud to Instagram, Tweet and post … or create a life size canvas of!
I travel a lot to combine my two passions (photography and travel), and having studied a Bachelor of Fine Arts, majoring in photography, the following question comes up a lot between myself and fellow travellers – “How do I take better photos?”
Here are some simple tips to improve your photography, you’ll be surprised how basic some of these seem but they really will make the world of difference.
1. Read the manual
I know you’re laughing and about to stop reading thinking this is common sense but you wouldn’t believe how much this step is overlooked. The best way to know what to do with your camera is to actually read the manual. Every model is different, so by reading the manual, you’ll get to know all the cool things your camera can do!
2. KISS…. keep it simple sweetie
Never try and put too many elements into your image, it’ll just look busy and people won’t connect with your real focus/point. One or two points of interest are enough.
3. Get up close and personal
Sometimes your images feel like something is missing. Fill the frame with your subject and see how this improves. Be conscious of your background and what the real subject of your image should be. A bit of ‘negative’ space is great but find that balance of details and depth and engage the viewer.
4. Know the light
Where is the light coming from? Before you even grab your camera, see where the light is coming from, and use it to your advantage. The light may be natural (from the sun) or artificial (for example from a lamp) but consider how can you use it to make your photos better.
5. Use flash during the day
After you have considered the light consider using your flash. Lots of people forget to use flash during the day but it can really help eliminate any heavy shadows and balance out your exposure.
6. Show some perspective
Whether you’re photographing kids, babies, cats or dogs – get down low and make eye contact with them. Eye-to-eye is powerful and engaging while looking down on a subject can often be distancing. When photographing portraits, position yourself at eye level to relax your subject and as a show respect. On the flip side, if you are wanting your portrait to suggest or imply passivity and aggressiveness use your camera angle to do this (slightly positioning your camera above/below the subject respectively).
7. Rule of Thirds
This is one of the most common tips that pop up when it comes to improving your photos and understanding composition. For some of us this will come naturally but for others you’ll need to work on it. Basically, you cut your frame into thirds by using both horizontal and vertical lines. You then place your point of interest over the cross sections of the grid. Check out this article for further details about using the rule of thirds.
Now some technical bits and pieces. The three pillars of photography …
ISO
Understand your ISO and use accordingly. ISO is the level of sensitivity of your camera to available light, in short the lower the ISO number, the less sensitive it is to the light, while a higher ISO number increases the sensitivity of your camera. Ultimately it affects the grain of your final image and how it captures movement of the subject matter.
F-Stop
This refers to your aperture setting – the Focal Ratio that will determine your depth of field (what is in focus and what isn’t). Depth of field increases with the f-number. It’s a big topic but once you master this it can really add that wow factor to your pictures.
Shutter speed/Exposure
Shutter speed, ISO and aperture go hand in hand as each effect one another. So it’s important you understand all of them! Shutter speed or exposure time, is the length of time a camera’s shutter is open when taking a photograph. Being aware of your shutter speed means the difference between freezing action or blurring movement. What you choose depends on the effect you are after. To capture fast action you will have to use a shutter speed over 1/500th of a second, if not 1/1000th to 1/2000th. Alternatively, you might want to capture the long streaks of a car’s taillights as they pass by. For this you would change your camera’s shutter speed to a long exposure. This could be one second, ten seconds, or even longer.
LASTLY, TAKE A LOT OF PHOTOS! With the digital age there’s very limited costs holding you back. Snap away.
One last reminder though, don’t show people how well you take photographs while on holidays. You’ll be roped in to being their personal photographer in no time. Trust me!
Contact us if you’d like help with any of your photographic needs.